This is a LED strip dimmer and Power shield using the MysX standard in MySensors.org.
**Please note some images and video instructions show a earlier revision (connecting to EasyPCB rev 9 but this has been updated!)
**
Why?
Just like a shield on a Arduino or Raspberry PI you can add features on your MysX compatible PCB/node by just adding this shield. In my case I wanted an easy way to attach a LED power supply and drive a dimmable led strip. I will add this to my Easy/Newbie PCB as a shield. The Easy PCB will act as the MySensors brain (communication with controller and dim level output) while the LED board will handle the power and led.
What?
- Input for LED power supply.
- Mosfet to dim your LED strip
- Exposed copper as heat-sink (depending on heat you might have to improve this!)
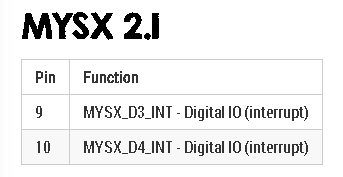
- Possible to use LED power supply to drive motherboard through MysX.
- Smoothing capacitors for VCC
- Possible to solder Screw Terminals for attaching power and led-strip.
This board have a input for your LED strip power supply (Normally 12-24v). On the board you can add a Mosfet which will be controlled by PIN3 on the MysX connector. You also have a resistor in series (see your mosfet datasheet in needed). When adding your power supply for the led strip you can choose to let this power supply drive the VCC pin and the motherboard as well. This way you can avoid dual power supplies. Be sure to regulate down the power with a voltage regulator (TO-220 package) and add capacitor for smoothing the power.

How?
Build the board according to BOM. Make sure you choose the right Mosfet and Voltage regulator for your power supply.
Example:
- 12v = Mosfet = irlz44n, Voltage Reg (12 to 5v) = LM2940CT
- 24v = Mosfet = irlz44n, Voltage reg (24 to 5v) = LM2940CT
- Use a Mosfet/Voltage reg with the same pinout! Compare before buy!
Resistors are optional and depends on if the gate needs some current limitations on the mosfet (irlz44n = none, just bridge with wire).
Capacitor is to smooth the 5v voltage regulator - check your datasheet (LM2940CT = 0,47uF Input, 22uF Output)
Compatibility MysX boards
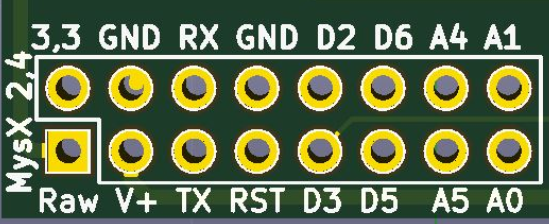
This will connect to any MysX 2.0.1 and above. This means the MysX connector should be aligned with pin 1 towards a corner so please check this on your motherboard before ordering this. If you are using EasyPCB you need Rev 10 because older revisions on the EasyPCB pin is is located towards the middle of the board. I have made Gerber files fitting EasyPCB Rev 9 and below go here but these you need to order manually at your pcb factory. Using the buy link on this page will get you latest revision fitting EasyPCB Rev 10.
I want it!
Order 10pcs: openhardware.io (Recommended!) and support me and MySensors!
Download from this page to get Eagles and Gerber files. Note that the Gerber files are run with Itead cam job.
If you want a faster shipping time or fewer pieces you can buy them from me via Ebay.
Links
Suggestions for next revision
- Mounting holes to tie strip down.
- SMD pads for solder strip wires
- spacing between to220 to allow heatsink


 MysX Led board